
Sitecore recently introduced Single Sign-on allowing users to log on to Sitecore apps with existing identity providers. At Assurex we love to work on the upcoming features of the Sitecore platform and were invited by Sitecore to try this new feature and share our thoughts about it.
First impression, the integration was straightforward and quick took me a couple of hours to get it working.
And here is the blog post to share my experience and walkthrough of the steps involved.
How has it worked until now?
Until recently Sitecore allowed you to log on to its systems using the Sitecore Authentication using the account you created with Sitecore i.e. using a traditional Username and password.
What has changed?
Now Sitecore has introduced a feature that allows you to choose your own identity provider and allows you to invite users with specific domains to use their credentials to log onto Sitecore Apps.
Let’s set it up
Let’s now look at the steps to enable this feature in your Sitecore Cloud tenant. To setup and enable the Single Sign-on you would need to configure OpenId Connect.
OpenID Connect is an authentication protocol that builds upon the OAuth 2.0 framework. It provides a standardized way for users to authenticate and authorize access to their resources on different websites or applications without sharing their credentials (such as username and password) directly with the relying parties.
Prerequisites to configure the SSO:
- Valid Organisation Admin or Organisation role access on Sitecore Cloud.
- Access to MS Azure.
- Access to the Domain Name System of the organization you are trying to configure SSO on.
Here is the overview of the steps needed to set up the SSO
- Register your Sitecore Cloud Portal with your OIDC identity provider.
- On the Sitecore cloud add a new SSO connection.
- Test your newly added SSO connection using built-in capabilities.
- Verify the domain to the mapped connection.
- Enable the connection.
- Test with real users.
Let’s look at each one of these in detail:
Register your Sitecore Cloud Portal with your OIDC identity provider
The first step is to register your Sitecore Cloud Portal with the OIDC identity provider. You can select one of the following OpenID Connect identity providers –
- Azure Active Directory
- Okta
- Auth0
- Or, any other identity provider that supports the OpenID framework.
In this post, I covered the setup using Azure Active Directory and integration using other providers will be the subject of another post.
Create an Application in Azure Active Directory
- Navigate to Microsoft Azure portal https://portal.azure.com/ and log in with your username and password.
- Search for Azure Active Directory and you will land on the below page.

- Select App registrations from the left pane.
- Click on the + New registration from the right pane, as marked in the below snapshot.

- You will navigate to the following page, and enter the below information.
- User-facing display name of the Application
- Supported account types
- Redirect URI [select Web from the dropdown] and enter redirect URL: https://auth.sitecorecloud.io/login/callback

- Click on the Register button.
- After Registration, you will navigate to the following page. Click on the Certificates & Secrets from the left pane.

- Next, click on the + New client secret on the middle pane and add the client secret key (you can add any name of your choice) as shown below.

- After adding the Client secret key you will navigate to the below page, capturing the client-secret value.

- Prepare the following set of data to create a new SSO connection on Sitecore Cloud.

- Client Id and Tenant Id are available in the overview section, as shown in the below snapshot.
- Client Secret is available in the Certificates and Secrets pane.
- Well-known/Issuer can be configured through Tenant ID https://login.microsoftonline.com/<TenantID>/v2.0/.well-known/openid-configuration

On Sitecore cloud add a new SSO connection
- Navigate to Sitecore cloud https://portal.sitecorecloud.io/ and login with your credentials. Click on Admin link available in header and select Single Sign-On(SSO) from left pane from the Organization Management section, as shown below:

Click on Add SSO connection and select OpenID Connect from the context menu.
Fill the following detail:
| Email Domain | Domain Name of the organisation | Sample: xxxxxxx.co |
| Connection Name | Provide name for | Sample: SitecoreSSO |
| Connection type | Select Back Channel from dropdown | Back Channel |
| Issue URL | The URL of the discovery document of the identity provider you want to connect with | Sample: https://login.microsoftonline.com/xxxxxxxx-xxxx-xxxx-xxxx-xxxxxxxxxxxx/v2.0/.well-known/openid-configuration |
| Scopes | Scope items to be requested during authentication process | openid profile email |
| Client ID | The client Id of the app, created in Identity provider | Sample : 3efbf90d-c392-4fa6-9893-7def0d516232 |
| Client Secret | The client secret of the app, generated through Certificates and secrets. | Sample : bHu8Q~Wc8p43fWtemUtCkeAtcnW2Doty9Vhbodu- |
| Callback URL | The address where the identity provider will send the authentication response | https://auth.sitecorecloud.io/login/callback |
After that click on Save button.
Test your newly added SSO connection using built-in capabilities.
- To test the newly created connection, navigate on the https://portal.sitecorecloud.io/organization/members/sso and click on the Test
- In the Test SSO connection dialog box, click on the Start test.
- Sign in using your identity provider, enter valid Email address and password and complete the MFA.
If all settings are correct, you will get the following screen, in case of failure revalidate all the settings and try again.

Verify the domain to mapped the connection
- Next step is to verify the domain, to verify the domain navigate to https://portal.sitecorecloud.io/organization/members/sso and select the SSO connection which you want to verify.
- In the Verify domain dialog, copy the TXT record, then add it to your domain’s DNS record.

- Create and configure the TXT record at your domain with the value provided by the Sitecore cloud.
- Click on the Verify Domain.
Enable the SSO connection
- Once you’ve verified the domain and tested your newly added SSO connection, you can enable it.
- To enable the SSO connection, navigate to the https://portal.sitecorecloud.io/organization/members/sso locate the SSO connection you want to enable, and click Enable.
Test with real users
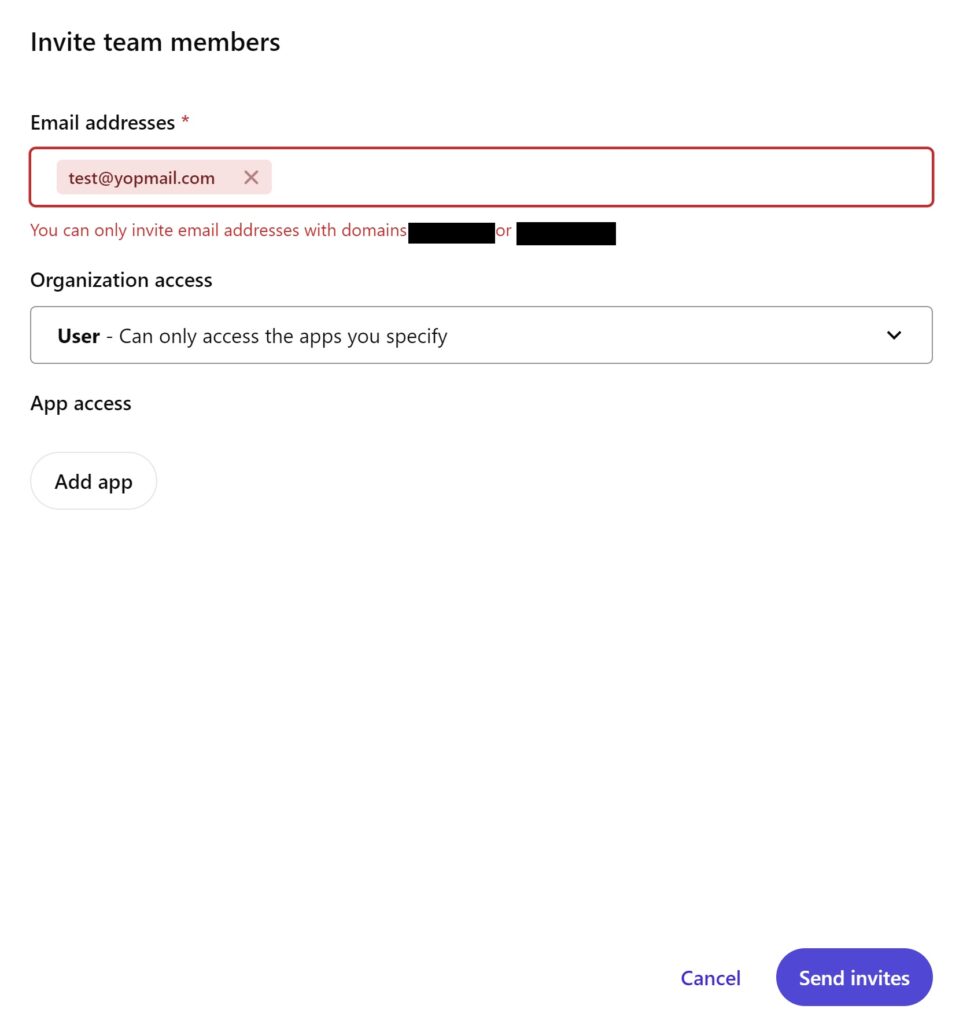
To verify the newly setup SSO connection, navigate to Admin page from header and select Team members from User Management section.
Click on Invite button, to invite team members.
Invite any invalid user, as shown in below snapshot:
Invite any valid user, as shown below :

Now that you have configured SSO What’s going to happen to existing users, pending invites or non-SSO users?
Log Ins –
- All team members that joined before an SSO connection was enabled can still log in and retain their current organization role and app roles.
- Team members that have email addresses with the email domain of an enabled SSO connection will log in using their identity provider.
- Team members with email addresses that are not associated with an enabled SSO connection will log in using the default Sitecore authentication.
Invitations–
- You can only send new invitations to email domains that belong to one of your organization’s enabled SSO connections.
- Pending invitations to email addresses associated with an enabled SSO connection domain must be sent again.
- Pending invitations to other email domains are still valid and can be accepted.
What if I want to delete the integration –
Team Members
- Team members associated with the deleted SSO connection can still log in using the default Sitecore authentication.
- They must use their old credentials or reset them before they can log in.
Invitations
- Pending invitations to email addresses associated with the deleted SSO connection domain must be sent again.
- If you delete all your SSO connections, all team members must log in using the default Sitecore authentication.
This concludes the post about how to enable and use SSO on the Sitecore cloud using Azure Active Directory. I would love to hear your thoughts, feedback, and questions.


